Like many other businesses, we send out a monthly email newsletter to keep our clients informed of important industry updates, tips and tricks, the latest company happenings and other news. It makes sense that so many businesses use email to communicate with their customers. After all, it is one of the most convenient and cost-effective forms of communication available today.
When reaching out to your customers via email, the key to successful communication is ensuring that they actually read your email. And to do this, they first need to see your email! The email platforms that we use today have become increasingly sophisticated – this is great most of the time because it keeps dangerous and annoying emails (spam) out of our inboxes. It’s frustrating, however, when a well-intended email gets deemed as spam or junk and shuffled out of sight. Few people actually check their junk or spam folder, so emails in this folder will likely go unread.
But don’t panic! You can ensure that the emails you want will appear in your inbox by creating a ‘safe senders’ list. Your safe senders list will be unique, containing only the email addresses that you have designated as safe.
This post provides a basic tutorial demonstrating how to add @limelightonline.co.nz to your safe senders list in each of the top email programs. Go ahead and add us to your safe senders list now to make sure you won’t miss any of our important updates.
If you frequently communicate with your customers via email, you may want to pass this post along to them too.


Safe Senders List for Microsoft Outlook 2016
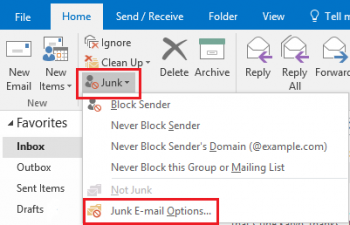
- Step 1: In Outlook, select the ‘Home’ tab.
- Step 2: Under the ‘delete’ group, click ‘Junk’ then select ‘Junk E-mail Options…’
-
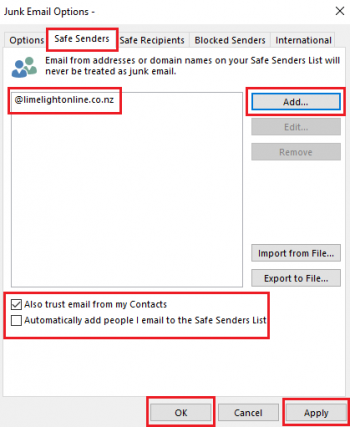
- Step 3: Under the ‘Safe Senders’ tab, click ‘Add’ on the right hand side then type in the email address or domain name you wish to receive emails from (e.g. limelightonline.co.nz). Click Apply then OK. The email address will now appear in the white box.
- Step 4: Ensure that the ‘Also trust e-mail from my Contacts‘ box is ticked. Click OK. The changes will apply once Outlook is restarted.
Safe Senders List for Microsoft Outlook 2010
- Step 1: In Outlook, select the ‘Home’ tab.
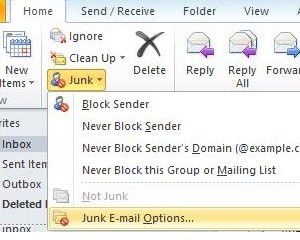
- Step 2: Under the ‘delete’ group, click ‘Junk’ then select ‘Junk E-mail Options…’
- Step 3: Under the ‘Safe Senders’ tab, click ‘Add’ on the right hand side then type in the email address you wish to receive emails from (letschat@limelightonline.co.nz). Click OK. The email address will now appear in the white box.
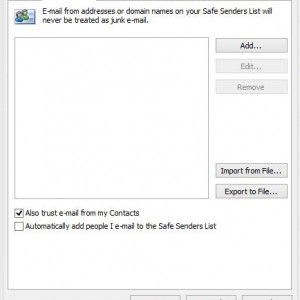
- Step 4: Ensure that the ‘Also trust e-mail from my Contacts’ box is ticked. Click OK. The changes will apply once Outlook is restarted.
Safe Senders List for Microsoft Outlook 2003 or 2007
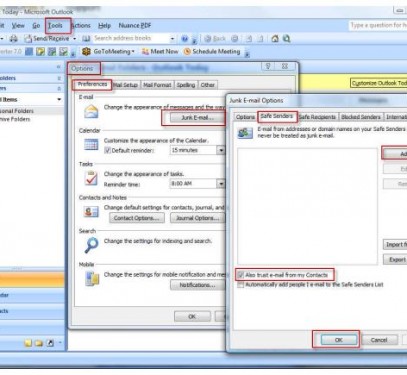
- Step 1: Once in Outlook, select ‘Tools’ and then from the drop-down list, select ‘Options’.
- Step 2: Under the ‘Preferences’ tab, click ‘Junk Email…’ then the ‘Safe Senders’ tab.
- Step 3: Click the ‘Add’ button the right hand side and type in the email address that you wish to receive emails from (letschat@limelightonline.co.nz) and then click ‘OK’.
- Step 4: Ensure that ‘Also trust email from my Contacts’ box is ticked.
- Step 5: Click OK, then OK again. The changes will apply once Outlook is restarted.
Safe Senders List for Gmail
You can create safe senders lists for top level domains (.com, .co.nz), domain names (limelightonline.co.nz) and email addresses (info@limelightonline.co.nz) by using filters.- Step 1: Log into your Gmail account and click on the little gear box in the top right hand corner and click ‘Settings’.
- Step 2: Click on ‘Filters and Blocked Addresses‘ along the top (see below) then click on ‘Create a new filter’ (text link):
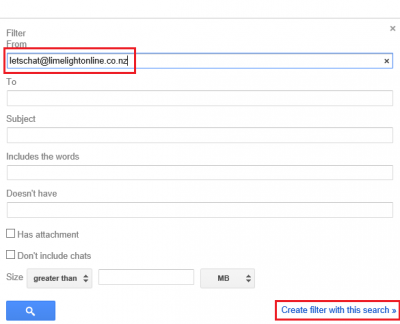
- Step 3: Click on ‘Create a new filter’ (text link at bottom of the page) and type in the address you wish to receive emails from in the ‘From’ box. Then click ‘Create filter with this search’ (see below):
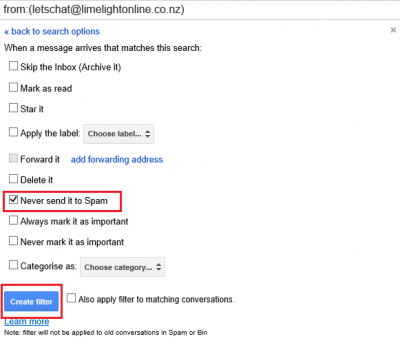
- Step 4: Select the option ‘Never send to Spam’ and click ‘Create Filter’. This will now tell Gmail that any emails from letschat@limelightonline.co.nz are not to be marked as spam, and will therefore appear in your inbox. Easy!
Safe Senders List for Spark Mail (ONLINE)
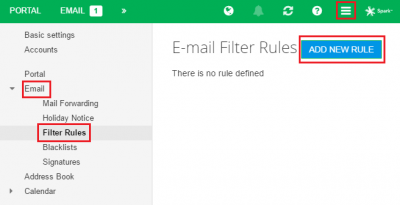
- Step 1: In your webmail service, click the square menu icon in the top right hand corner and select ‘Settings’. Step 2: Click ‘Email‘ then ‘Filter Rules’ on the left hand side. Click the ‘Add New Rule‘ button.
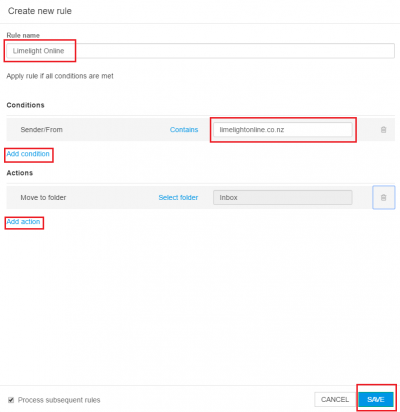
- Step 3: In the Rule Name box, type in ‘Limelight Online’. Underneath that, you will see a heading ‘Conditions‘ and a link that says ‘Add condition’ – click this link and select ‘Sender/From‘ from the drop down list that appears. In the box that appears next to it, type in ‘limelightonline.co.nz’. Step 4: Underneath that, you will see a heading ‘Actions‘ and a link that says ‘Add action’ – click this link and select ‘Move to folder‘ from the drop down list that appears, Keep the default ‘Inbox‘ that appears and then click ‘Save’.
- Note: this filter move any emails that come from the Limelight Online domain into the Inbox folder – ie, any email address that ends in ‘limelightonline.co.nz’.
